Secrets Management Overview
Secrets are any sensitive data in the application; including passwords, certificates, and keys. Whenever possible, it is best to de-couple secrets from an application and deliver the secret at the last possible moment.
Secrets Management Tactics to Avoid:
- Hard coded secrets
- Secrets packaged with code
- Secrets inserted via build or configuration management tools
- Exposing or configuring secrets as an image in the environment variables
What Secrets Management Does Kubernetes Provide?
- API Object to define secrets
- Values are based on 64 encoded
- Secrets are namespaced
- Secrets can be mounted as volumes
- Secrets can be used as environment variable inside a container
What is missing in Kubernetes Secrets Management?
- Encryption at rest (available in 1.130.0 and etcd v3) – API object provides encryption for sensitive data
- Secrets are created as shared (static) pieces of data and configured within the cluster or namespace for the application; it is difficult to make changes and secrets are not dynamic
- No leases, rotation, etc.
Vault by HashiCorp and Secrets Management
Vault by HashiCorp (Vault) is a tool for securely accessing secrets. A secret is anything that requires tightly controlled access, such as API keys, passwords, and certificates. HashiCorp Vault provides a unified interface to any secret, tight access control, and detailed audit logs.
Vault is designed to be secure by default. It is can be used with several different storage backends to provide dynamic secrets management.
Vault integrates with all major cloud providers.
A modern system requires access to a multitude of secrets: database credentials, API keys for external services, credentials for service-oriented architecture communication, etc. Understanding who is accessing which secrets is complex and platform-specific. Adding on key rolling, secure storage, and detailed audit logs is almost impossible without a custom solution. HashiCorp Vault solves this need.
What is a Dynamic Secret
Secrets should be created just-in-time and delivered only when requested. Each credential (secret) should be applied only to the client, account, or user that has requested the secret.
When a secret is assigned by Vault, a lease is assigned to the secret. If the secret is not used, the client goes away, or the application stops working the lease is not renewed and it is automatically deleted.
Vault automates some of the hardest parts of managing security across a large span of applications – making secret management elegant by employing and configuring best practices to automate many security aspects.
How Does Vault Integrate into Kubernetes
Vault uses the Kubernetes API to authenticate the JSON Web Token (JWT) of the Kubernetes Service Account. Vault checks the namespace and service account name of the token to verify that the pod making the authentication request is valid.
Kubernetes allows for the use of a separate container to manage passing the secret from Vault to the applications that need it. By using sidecar and Init Containers, the secret can pass from Vault and into a shared repository that is accessible by all of the applications that need access to the secret.
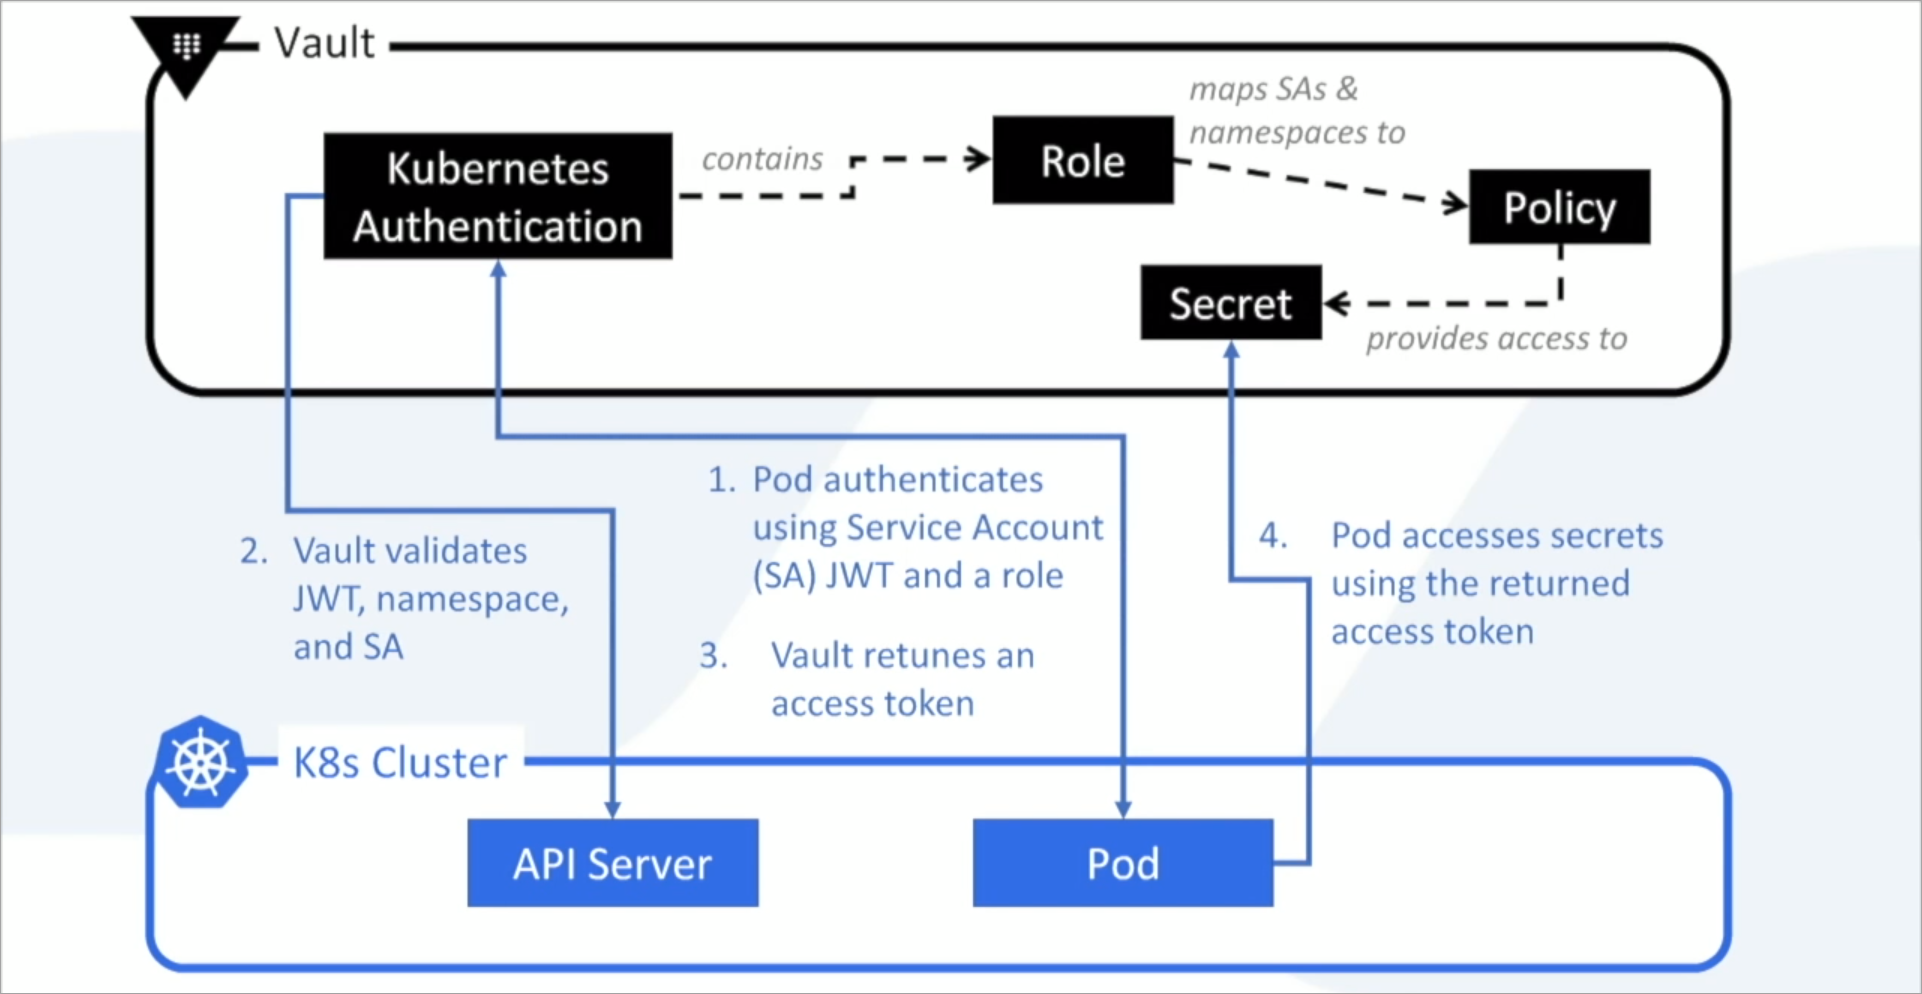
Using HashiCorp Vault to Manage Secrets in Kubernetes
Vault uses the Service Account name and JWT to authenticate the application and provide the requested secret.
- The application sends a role request to Vault using the Service Account name. The Service Account Name and Role must match what is configured for the requesting application in Vault.
- If the Service Account name and Role are associated with the requesting application, Vault returns a Token granting the requested role.
- The application calls back into Vault with the Token and the Role to fetch the secret.
This demo uses Nirmata’s Open Source Init Container project store the secrets fetched from Vault.
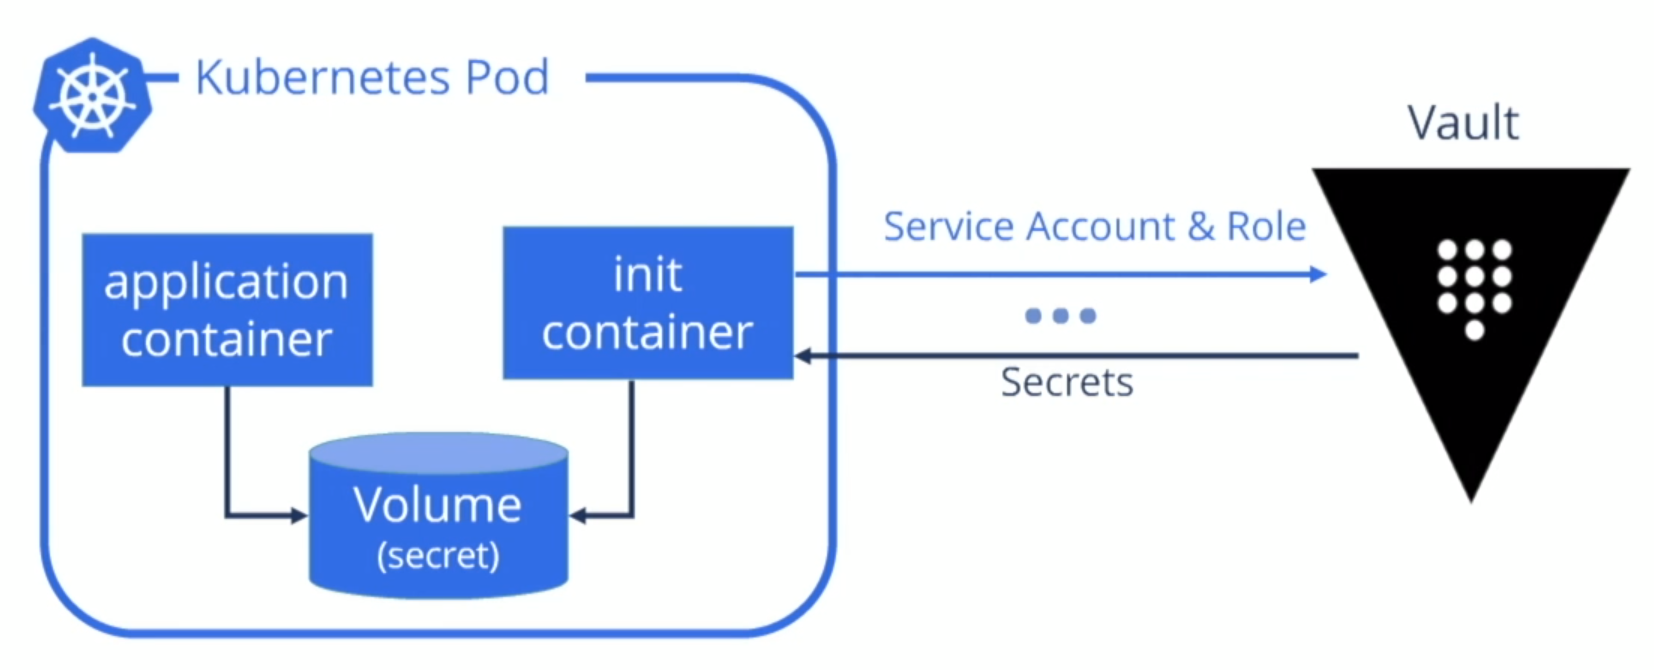
How Are Secrets from Vault Applied to Applications in Nirmata?
Applications in Nirmata are based on hyper-flexible policies that utilize label and based-on selectors.
To use a Vault-stored secret in an application in Nirmata, the application’s policy mutates the YAML and injects the appropriate service account, pod settings, init container, and a shared transient volume.
The init container communicates with Vault and fetches the secret. The transient storage is only available within the container and houses the secret obtained from Vault.
Integrating HashiCorp Vault with Nirmata
Integrating Vault with Nirmata allows clusters and applications managed in Nirmata to access secrets stored in Vault.
The integration requires just a few steps:

Prerequisites for this Demo
Before beginning this demo, ensure that the following is in place:
- Create a Secret in Vault
- Configure [Cloud Provider in Nirmata]/clustermanagement/cloudcredentials/
- Create [Host Group]/clustermanagement/cloudcredentials/hostgroups/host_setup/ within Cloud Provider in Nirmata
- Deploy a [Cluster]/clustermanagement/cluster_panel/ in Nirmata
- Make the Cluster available by creating an [Environment]/applicationmanagement/environments/ in Nirmata
Defining Secrets in Vault
This demo uses key value store secrets; however, most uses cases will require a combination of secret backends.
To define secrets in Vault, set an authentication method for each cluster. Vault requires certificates and keys to communicate with the cluster.
Within the authentication method, create a role for each application that must access the secret.
As a best practice, manage Service Accounts for each application role in Kubernetes. This allows Vault to check JWT validity against each application that accesses Vault since each application identifies itself with its own Service Account name.
It is possible to use the Vault API to fetch the secret and make it available to the application directly. However, in many cases, it is best not to code the call to the Vault API directly into the application.
Nirmata provides the Kubernetes Host, Kubernetes CA Certificate, and Token Reviewer JWT requirements for configuring a Kubernetes Authentication Method in Vault.
To access the requirements, select Cluster from the sidebar menu, then select a Cluster.
Click the gear icon to open the Cluster Settings menu and select Enable Vault. The requirements are displayed in the Configure Vault window.
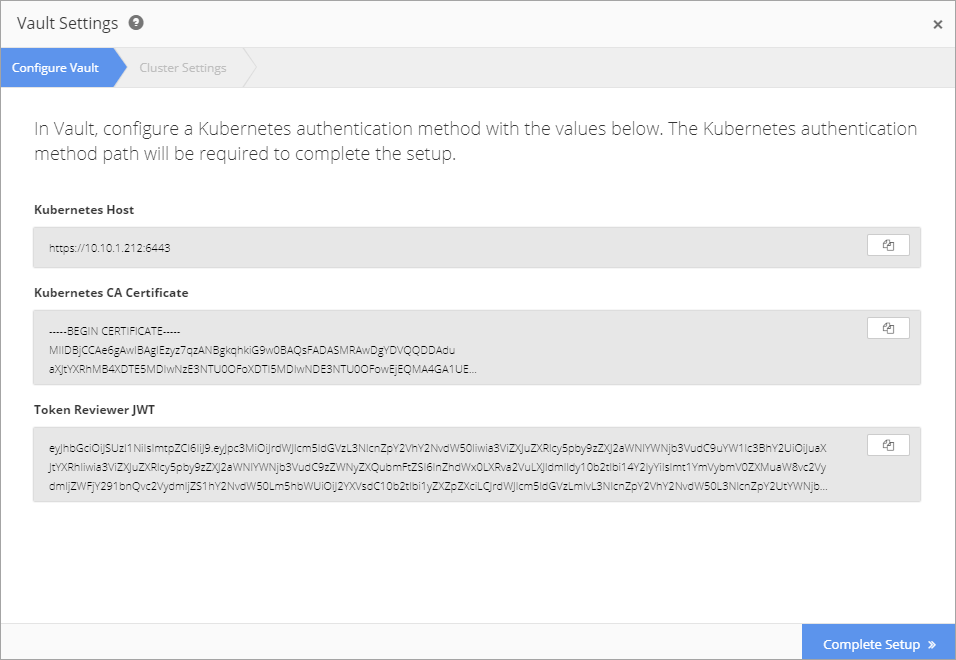
After retrieving the Kubernetes Authentication Method requirements, login to Vault Secrets Service.
A list of secrets is displayed. This demo uses the secret ghost/.

The Kubernetes Authentication Method for each cluster is configured in Access.
This configuration allows Vault to communicate with the cluster via the API.
Select View Configuration from the ellipsis menu button.
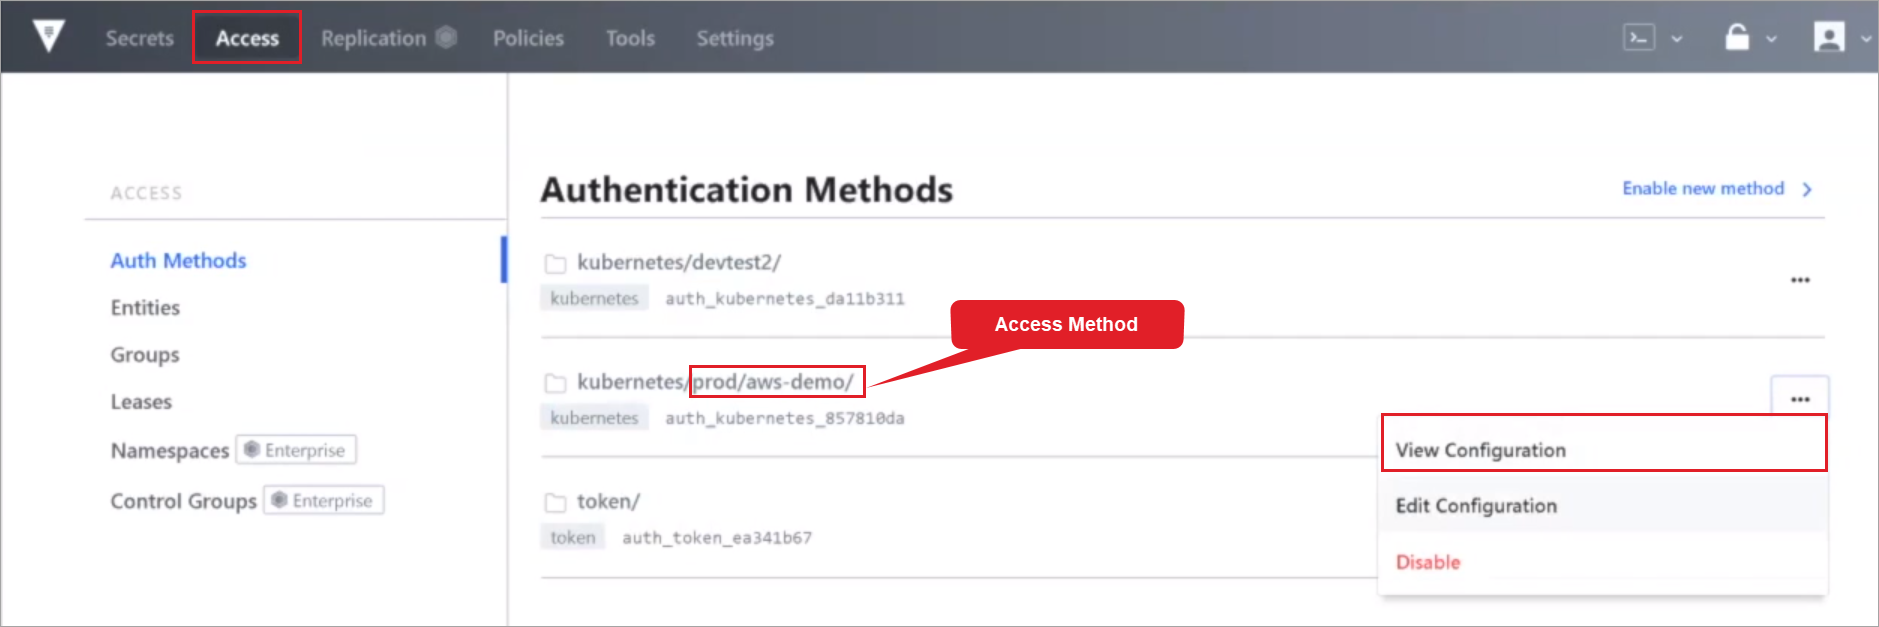
Verify that Configuration shows a Kubernetes Authentication Method (Path and Accessor) configured for the cluster.
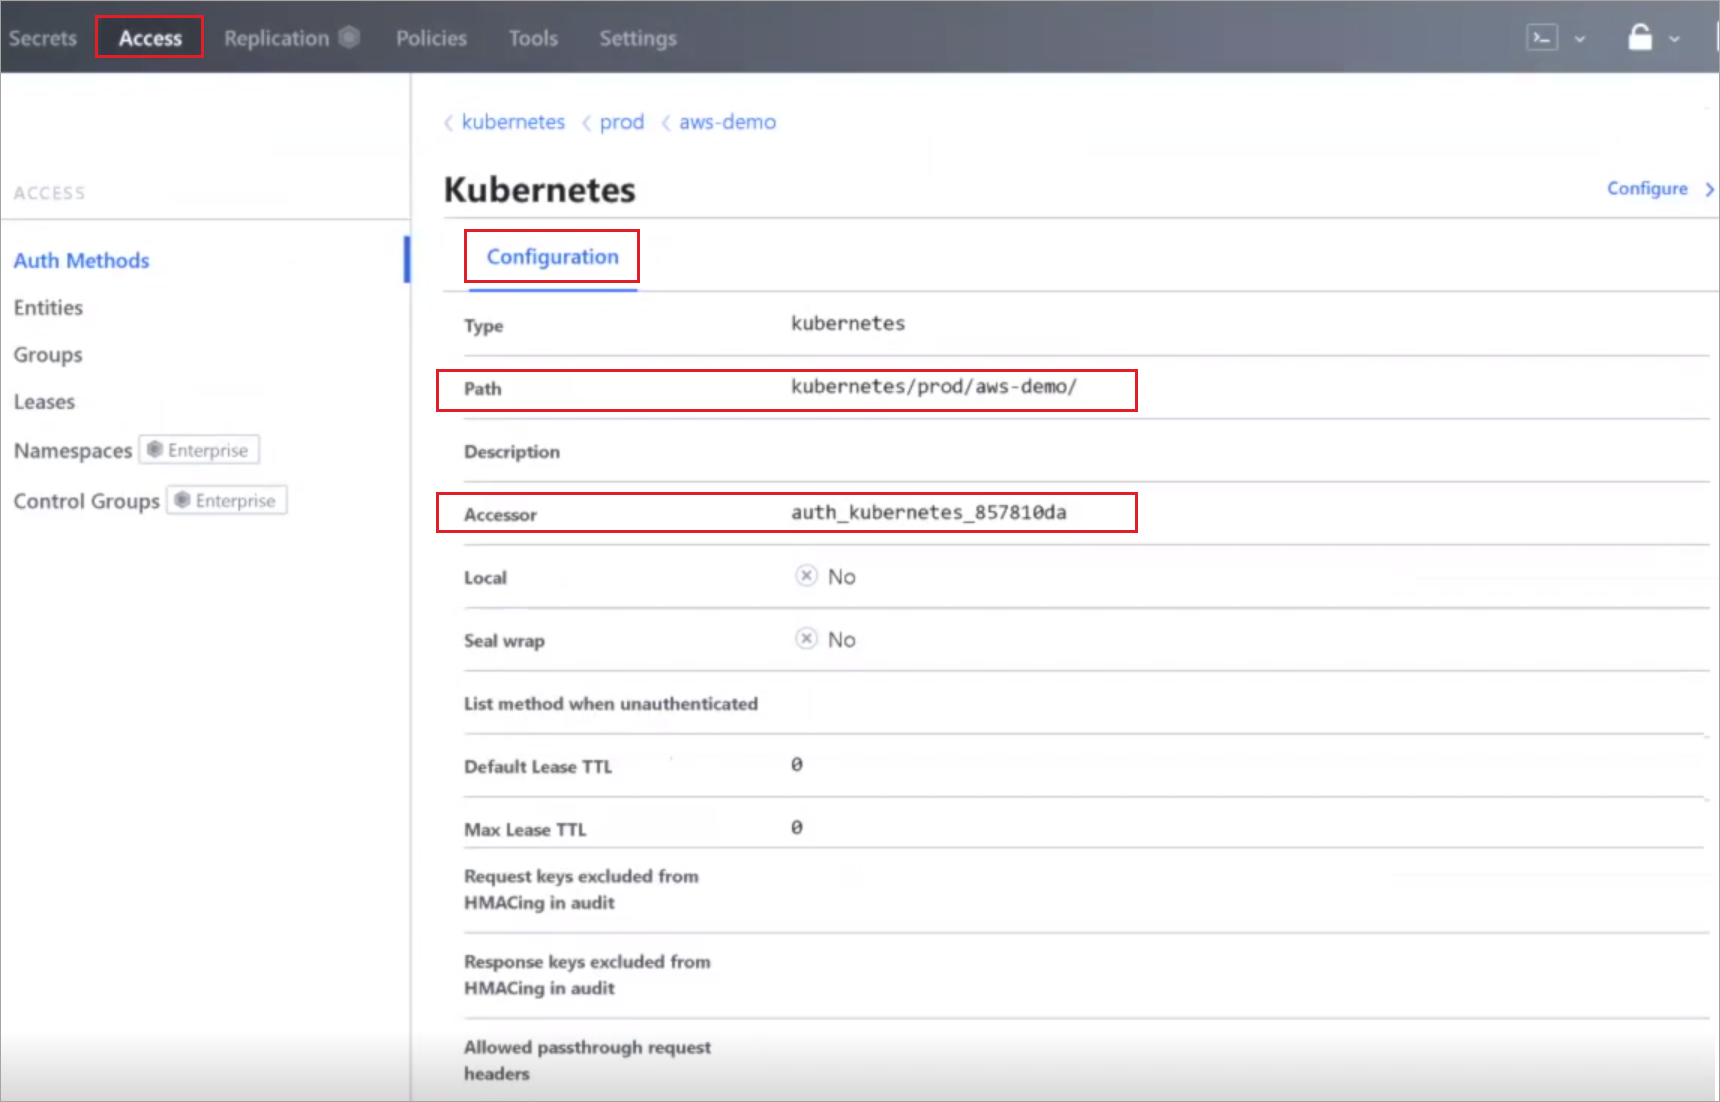
Next, setup roles in Vault in the backend for the application that will access the secret. In this demo, the ghost application will access the secret and run in various environments in the cluster
Using a command line, retrieve nodes and namespaces and workloads.
Retrieve Nodes Command:
kubectl get nodes
Retrieve Namespaces and Workloads Command:
kubectl get ns

The results show that there is a three-node cluster running on AWS deployed through Nirmata and lists the namespaces and workloads running on the cluster, which includes the demo application ghost running in two environments,prod and staging.
Enter Vault Settings in Nirmata
In this demo, the Cloud Provider is AWS; the name of the Cluster is aws-demo and the two Environments are aws-demo-prod and aws-demo-staging. To enter Vault Settings in Nirmata, return to the Configure Vault window and complete the required information.
Enter the Vault Address and Kubernetes Authentication Path.
Vault Address: IP address of the Vault service containing the secrets
Kubernetes Authentication Path: backend access method configured in Vault (Vault > Access > View Configuration > Path)
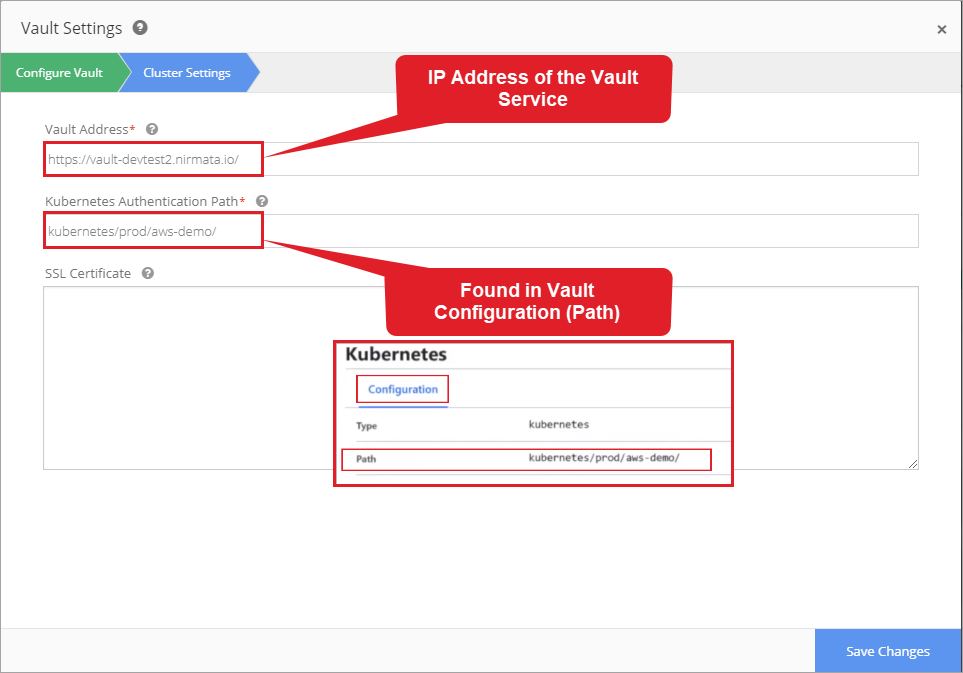
Create Secrets Policy in Nirmata
Policies allow secrets to apply to specific Environments and Applications. A Policy can be set to match a single application, a number of applications, or a custom label.
Custom Label: a grouping applied to a family of applications
In this demo, the two policies are ghost-prod and ghost-staging.
To create a new Secrets Policy, choose Policies from the sidebar menu and select Secrets.
Click the +Add Secret Policy button.
In General, enter the name of the policy and select Vault as the Secrets Manager. Click Next.
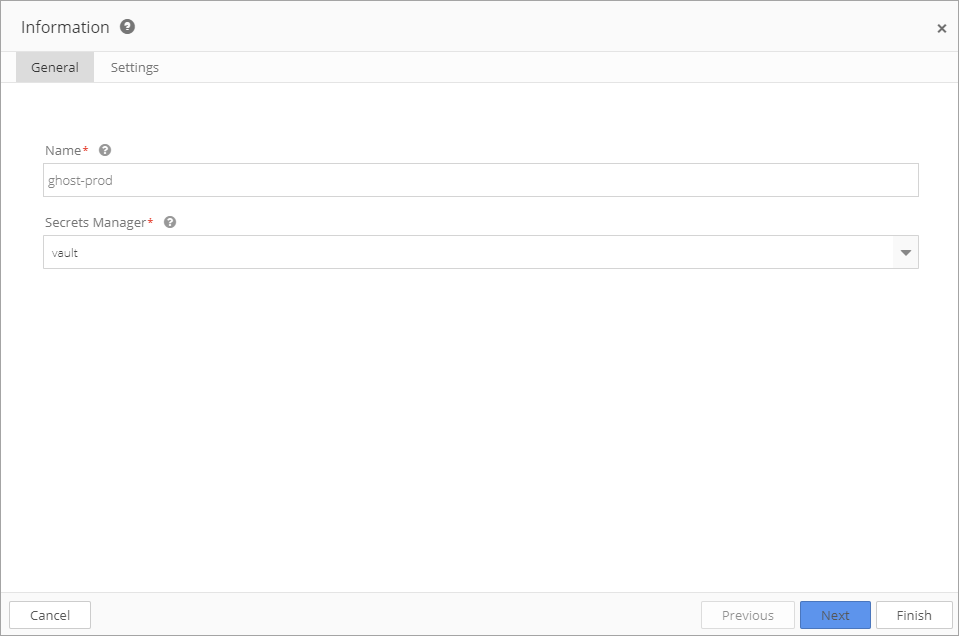
Configure each field in Settings.
Pod Selector: enter the Application name and Environment name to which the Secret Policy applies; a Policy can apply to a number of applications or a family of applications using a Custom Label.
Kuberenetes Auth Role: configured in Vault Kubernetes Authentication Method
Service Account: each role configured in Vault may apply to specific namespaces and service accounts; in this demo the service account is ghost-prod.
Secrets File Path: the path in which secrets will be stored; this setting allows secrets to be stored in a specific path in the container. Nirmata has released an open source Init Container project that creates a container in the Cluster for storing secrets. In this demo, the Secrets File Path is /var/run/vault.
Secrets: to add items to Secrets, click the +Add Item button. In the Vault Path field, specify the full path to the secrets or an individual key.
If the full path to the secret is entered, the Init Container will fetch every key value in the path and store it in the Secrets File Path.
If an individual key is specified, the Init Container will only retrieve the specified key. To rename the key in the file, enter the new name in the Key (in file) field. This allows the application to use a common name when consuming the key from the file.
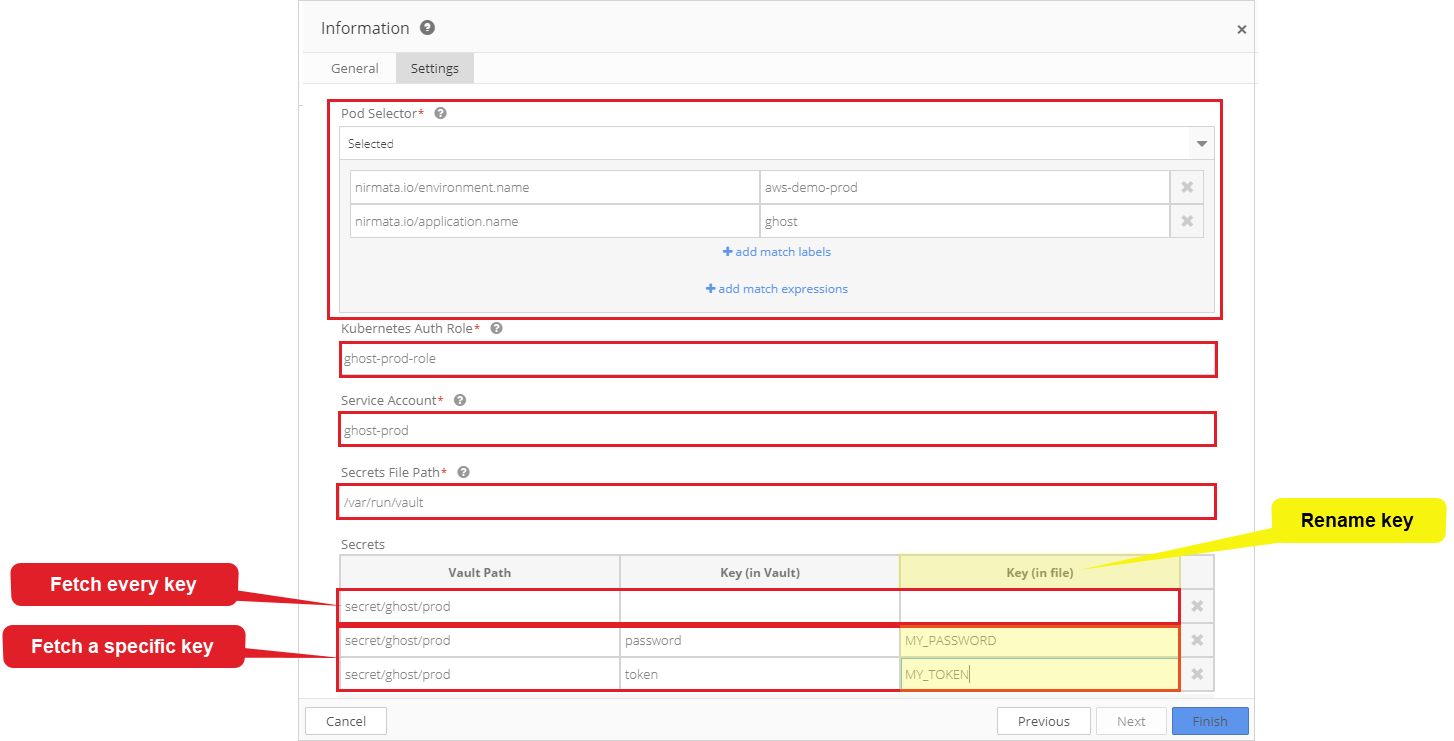
The ghost application runs in both staging and prod environments. The configuration of the container determines which secrets are fetched based on the environment in which the application is running.
The staging secret policy (ghost-staging) is very similar to the prod secret policy (ghost-prod) with exceptions of Environment, Service Account, and Secrets.
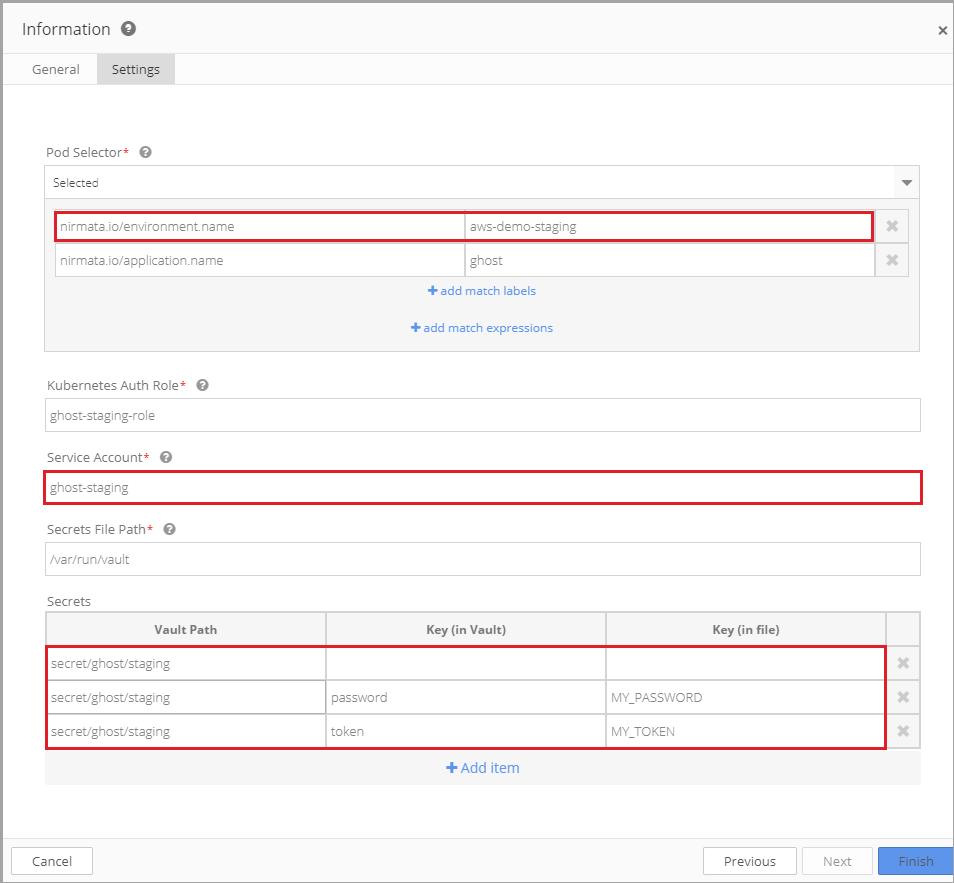
Next, verify that each Environment is associated with a unique secret in Vault.
In Vault, View Secrets for ghost/prod (Vault>Secrets>ghost>prod) and for ghost/staging (Vault>Secrets>ghost>staging); each has a unique value.
When the application runs in the chosen environment (prod or staging), the appropriate password is injected and runs in the container.
When application deploys, Nirmata injects the password that matches the Pod Selector criteria.
Run the Application in Nirmata
To run the application, select Environment and then click Run an application.
Enter a Run name and select the Application name. In this demo, the Run name is ghost2. Nirmata automatically generates a namespace name. Click Run Application.
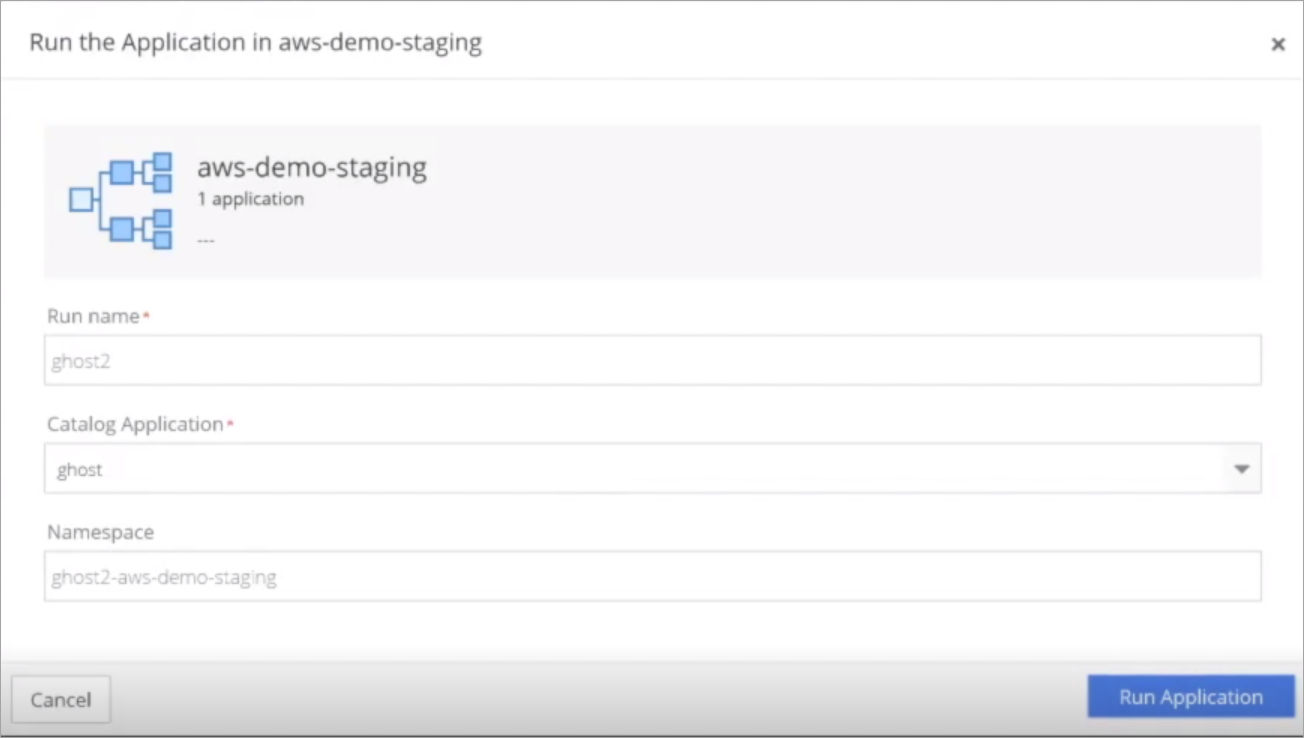
Nirmata begins deploying the application. Select Tasks for a detailed view of the information Nirmata is sending to the Cluster.
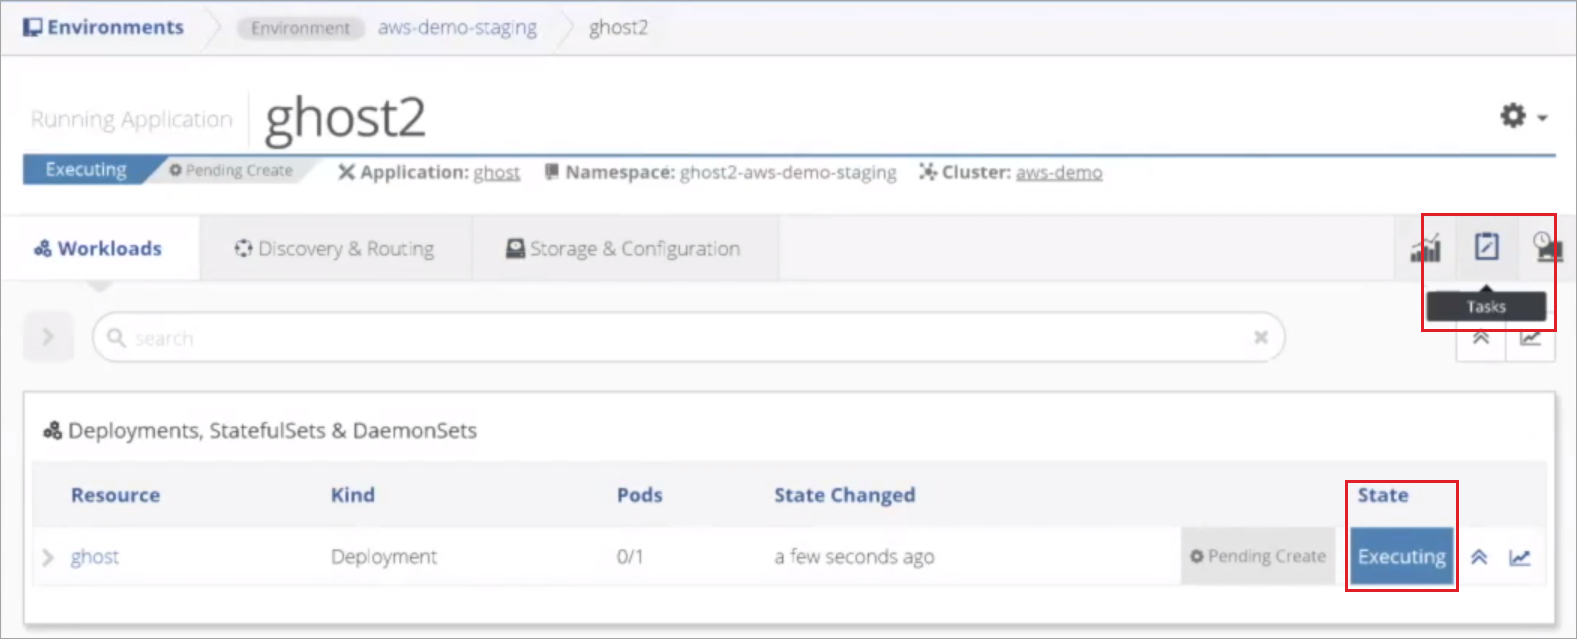
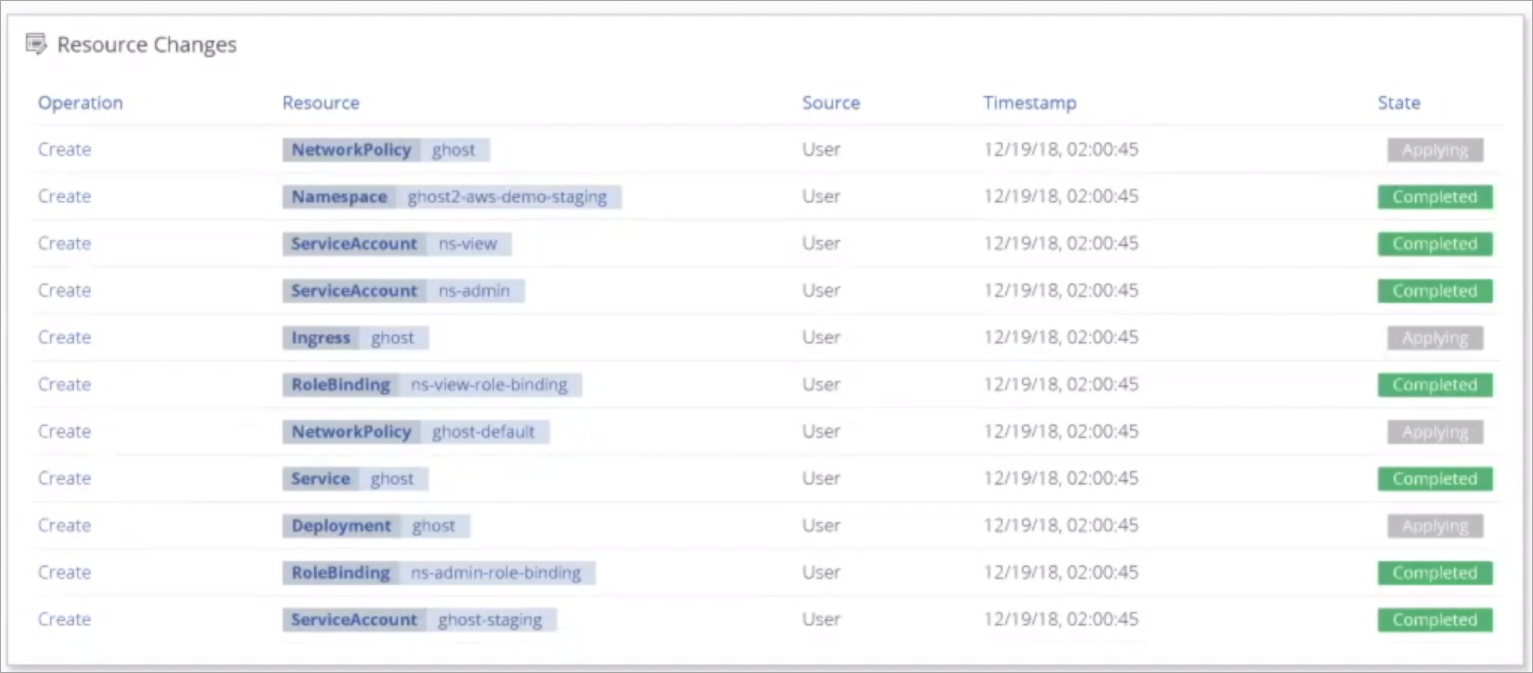
Verify Application Performance
Open a command line and retrieve namespaces and workloads to confirm that the application is running.
Retrieve Namespaces and Workloads Command:
kubectl get ns
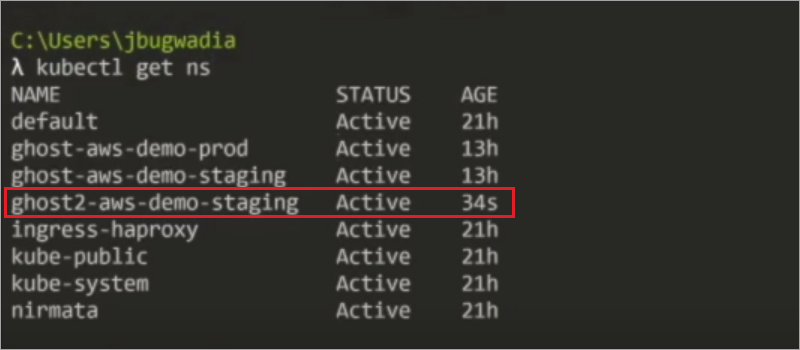
Next, check the pods running on the namespace using the Get Pods command.
Get Pods Command:
kubectl –n ghost2-aws-demo-staging get pods

Enter a Describe Pod command to see the details of the pod.
Describe Pod Command:
kubectl –n ghost2-aws-demo-staging describe pods
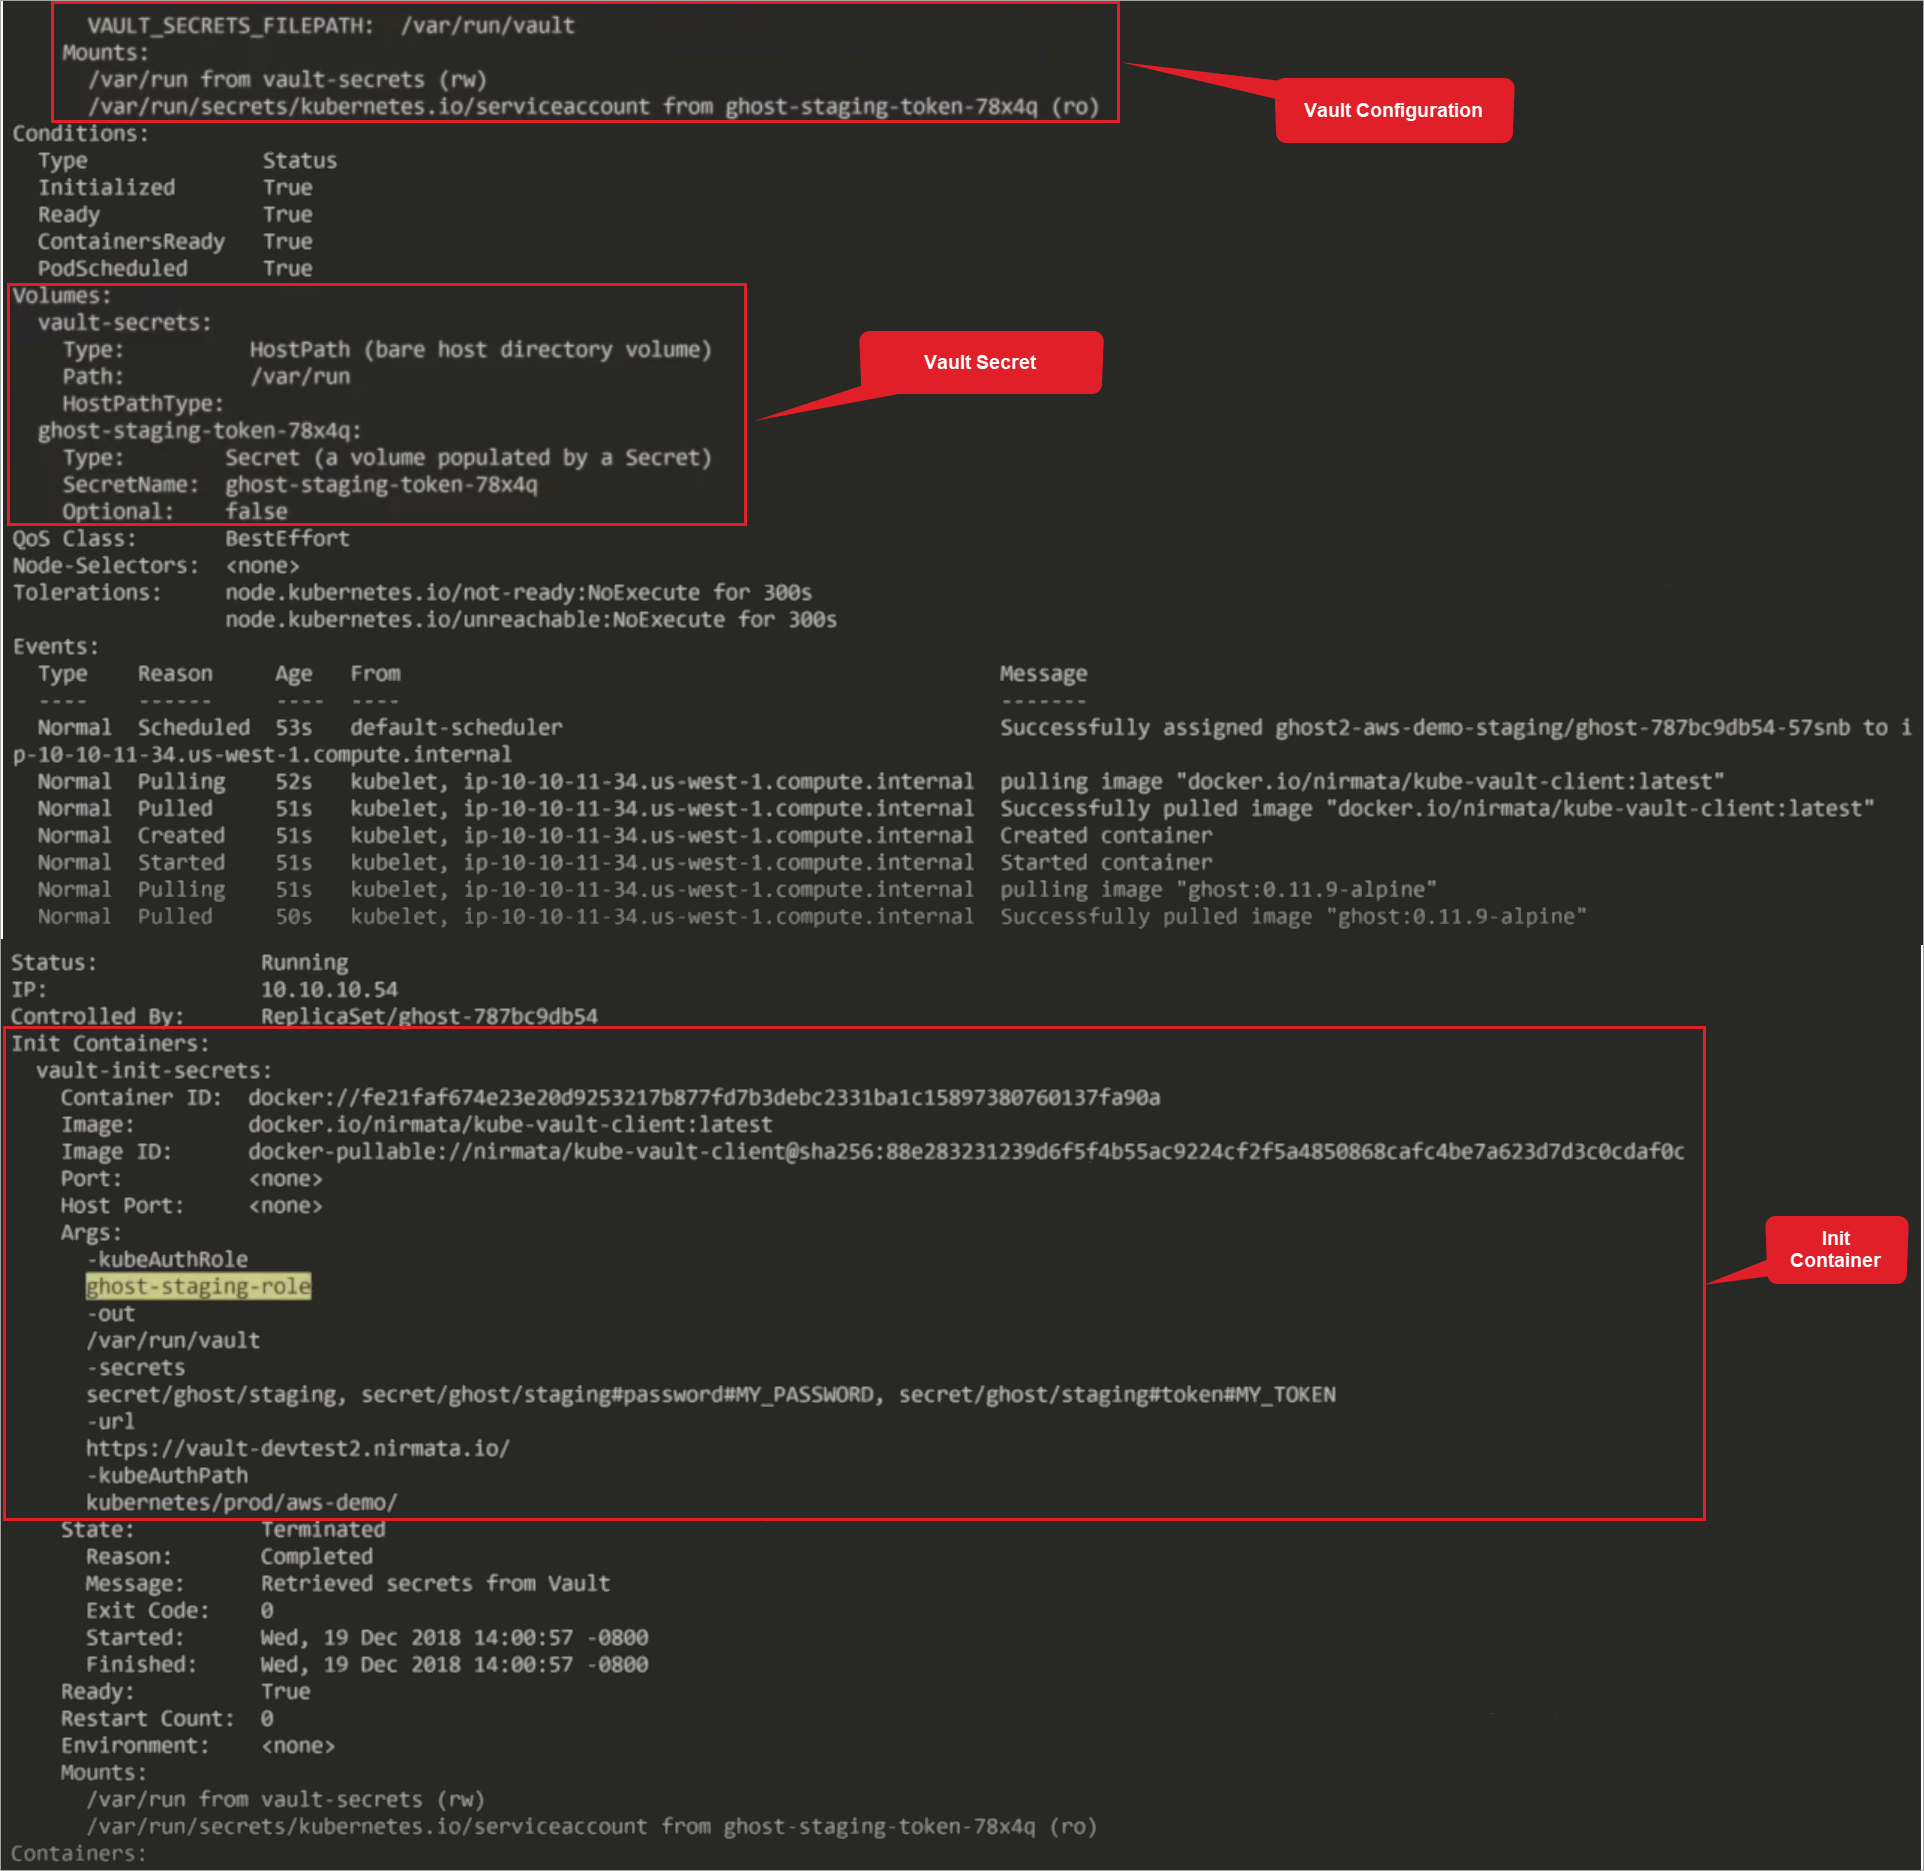
Next, view the secret in the pod to ensure the application can read the secret. To do this, retrieve the pod and then execute into the pod.
Get Pods Command:
kubectl –n ghost2-aws-demo-staging get pods
Execute into the Pod Command:
kubectl –n ghost2-aws-demo-staging exec -it ghost-787bc9db54-57snb bash
Enter the container that contains the secret using cat /var/run/vault.
The secret and the applied renaming conventions are returned. The secret and renaming conventions are available to any container within the pod.

Next, run the application in the prod Environment and display the secrets in the Init Container.

The prod Environment secrets are applied.
To view the raw YAML associated with the pod, use the Get YAML Command.
Get YAML Command:
Kubectl -n ghost2-aws-demo-prod get pod -o yaml